Depletion/Injection Settings table
Depletion Injection Settings table click to enlarge
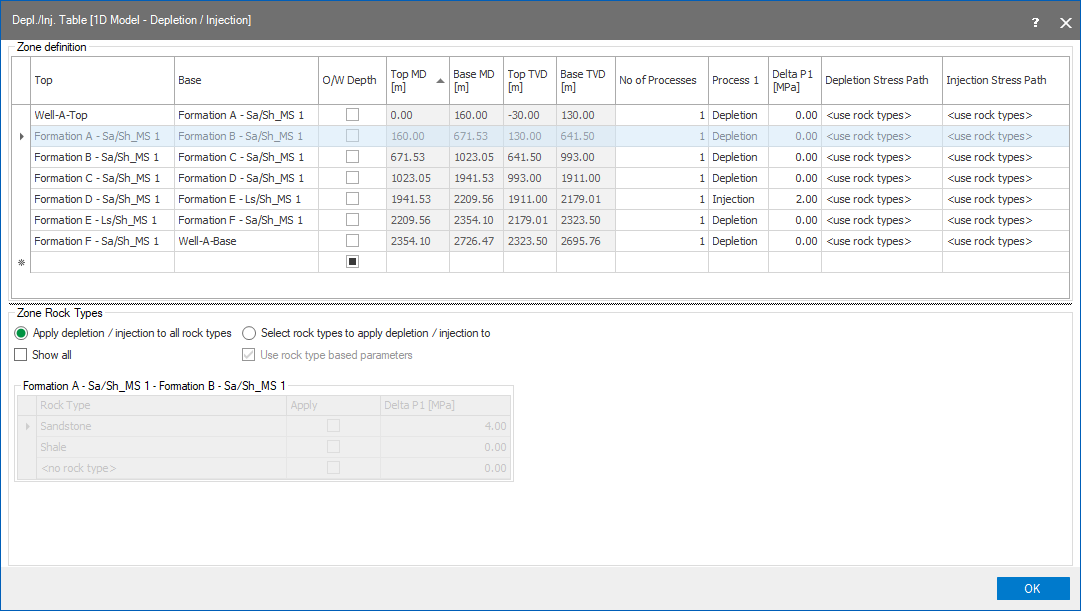
The Depletion/Injection Settings Table contains all of the formations in the project and allows for each formation to have a depletion/injection operation performed. For more information, see Calculating the effect of depletion and injection.
Top Identifies the marker at the upper bound of the formation.
Base Identifies the marker at the lower bound of the formation.
O/W (overwrite) Depth When this checkbox is checked, the read-only status of the depth columns is disabled so that they can be overwritten.
Top MD Top MD for the formation.
Top TVD Top TVD for the formation.
Base MD Base MD for the formation.
Base TVD Base TVD for the formation.
Number of Processes Select between 1 or 2 processes for the operation. Selecting 2 adds a second process and corresponding Delta P2 columns to the table.
Process 1 Select between Depletion and Injection.
Delta P1 Define the rate for the depletion or injection operation specified in Process 1.
Process 2 Only available if 2 is selected as the number of processes. Select between Depletion and Injection.
Delta P2 Only available if 2 is selected as the number of processes. Define the rate for the depletion or injection operation specified in Process 2.
Depletion Stress Path Specify the value for the depleted stress path.
Injection Stress Path Specify the value for the injection stress path.
Zone rock types
Per rock type you can specify Delta P1 and Delta P2 click to enlarge
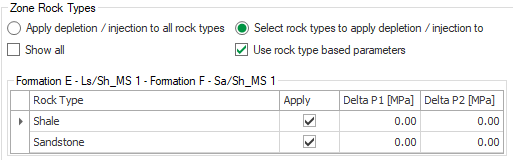
An additional set of options, Zone Rock Types, is available at the bottom of the table.
This allows you to apply the depletion/injection effect to select rock types in each formation, and to specify more than one delta pressure per rock type. By default, the depletion/injection effect is applied to all rock types. By selecting the Select rock types to apply depletion/injection option, you can select the rock types for the active formation (the formation that has focus in the table above). When you select this option, the Use rock type based parameters checkbox is also enabled. This allows you to specify Delta P1 (and optionally Delta P2) per rock type per formation. The image below shows an example of this; Formation D has the focus in the Zone definition table, indicated by the small black arrow to the left of the Formation D row, making Formation D active in the Zone Rock Types section. In the Delta P1 column, specify the rate for the depletion or injection per rock type.
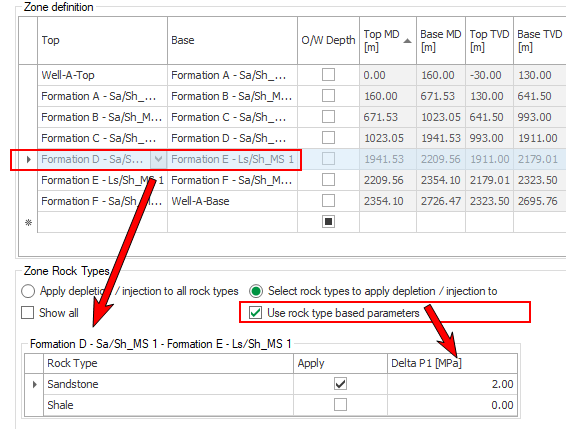
Example of selecting rock type, and specifying Delta P per rock type click to enlarge
You can also select to view all of the formations by checking Show All. With Show All checked, you can enable the Select rock types option and choose the rock types for each formation to apply the depletion/injection settings to.

With Show all selected click to enlarge